- Home
- Make Your Own Wig
- Diy Side Part Bob Wig
DIY Side Part Bob Wig
(A two-tone effect large curl bob wig with side parting)
 Completed Look
Hey there, hair weave DIYers and welcome to the DIY side part bob wig guide.
This guide uses a no-sew method but you can always sew if that's what you prefer, either way you'll end up with a great addition to your wig-wardrobe.
As always this is a guide and you can adapt it to suit your look and although this uses a DIY closure piece, you can opt for a lace closure piece (there's a DIY wig with lace closure guide that shows you how).
DIY Side Part Bob Wig: Top Tips
The pink lines in the images are to show how to position of tracks of hair weave and not indicating the number of track of hair weave - it's up to you how full you want your wig to be and the usual guide is; curlier hair weave requires fewer tracks to look full - but adapt this for your own look.
Click on images to enlarge or use zoom.
You can pin all the tracks on the mannequin head before you glue or sew to get a feel for the finished look.
Finally, pace yourself and work slowly and you'll end up with a really stylish homemade side part bob wig - how cool is that?!
Tools for DIY Side Part Bob Wig
 Tools for DIY side part bob wig
- Hair weave - three bundles should be fine for longer hair, but you can get away with two bundles for shorter lengths up to 25 cm (12 inches) as the hair is often thicker
You can either choose one length for a non-defined layered look or for a sharp layered look choose three different lengths.
You can use any texture of hair weave for this wig - Stocking cap or wig cap
- Bonding Glue
- Bonding Glue Remover (we all make mistakes, so just in case)
- Scissors
- Polystyrene (Styrofoam) or mannequin head
- Pearl headed pins (optional but really helpful)
Step 1: First section start at the nape

This guide shows three colours and three types of curls - choose the colours and hair texture you want for your look.
Start your wig by laying 3-4 rows of hair weave in a straight line across the nape area (if you're using more than one colour of hair weave, use the darkest for this section)
After 3-4 rows, continue to add rows upwards following the pink line pattern in the photo
You should end up with rows that are high at the back and low at the sides (barely higher than the ears).
*Add as many rows as you need to get the fullness you want
Step 2: Second section, create a sloping effect at sides

Create a sloping bob look by laying rows of hair weave in a slanted position - see pink lines in left image.
*If you're using different colours of hair, this is a good place to use your second colour.
Make sure that these rows overlap the first section of rows evenly.
Add 3-4 rows to each side (temple to top of back) following the pink lines in the right image - this will add more volume.
Step 3: Working up to crown area

Continue to lay rows of hair weaves upwards towards the crown area at the top of the head.
Keep working around the head (in a large rounded U shape).
Repeat until the front forehead measures approximately 12 cm (5 inches)
Step 4: Add volume at rear crown areas

Add two more rows at the top back of the head, see pink lines in image.
Now is a good time to mark the crown point of the wig - mark the crown point which should be 8 cm (3 inches) from the front of the cap.
*If you want more volume, add more rows closer together
Step 5: Add volume to sides of crown

Use third colour if applicable; otherwise continue with the colour from the second section (Step 2).
Lay two rows around the head working in a U-shape.
Keep rows close together
Then add one or two smaller tracks on each side to add volume - see image on right.
Step 6: Create right side parting on crown

Create a natural right-side part by laying shorter rows starting at the left side of the wig - see pink lines.
This will help direct the hair to the left side of the parting.
Step 7: Create side parting at front

Take a small 5 cm (2 inch) piece and create a bend at the middle to create a parting look -see pink lines in left image.
Lay it at the parting point at the front - see left image.
Repeat this pattern of rows using longer tracks each time to build volume at the parting area.
*Lay the rows closely together.
Step 8: Closing the crown
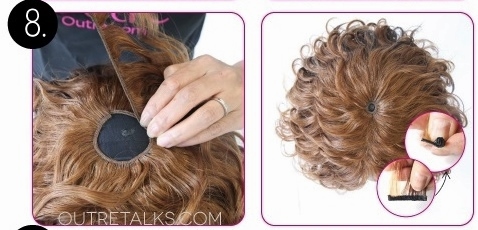
Completing your DIY side bob wig.
Continue working towards the crown point in the side parting pattern in Step 7 until you are left with a pea-sized opening to close.
Create the closure piece by taking the 2.5 cm (1 inch) width of weft hair and carefully applying a small amount of glue on both sides of the weft - the glue should be on the track only.
Wait 10 seconds then roll up the piece so that it’s small enough to fit inside the pea-sized area at the crown.
Once it is inside the opening, spread the hair outwards, and press it down firmly to flatten.
Step 9 (Optional): Finishing the Look

You can leave your DIY side part bob wig as is, or you could trim the (longer) right side to balance the lengths of both sides.
You can then add curls or waves to your homemade side part bob wig.
*You can smooth out the top of the hair using a flat iron.
*When styling and combing, always direct the hair away from the face.
Fin!
You've just completed your DIY side part bob wig!
Now you've learned how to make your own side part bob wig, you can sit back, look pretty and check out the DIY side part layered bob wig guide.
Why not post your comments or tips about this how-to guide or share your thoughts on anything about DIY wig making by using the form below.
Oh and you could also join our blog, to keep up to date with the next article or how-to guide - it's easy to do and doesn't require any personal info!
Images and basic steps about how to make a wig can be found at http://www.outretalks.com/
26/03/16
How will you make your own wig?
Do you think you'll take the plunge and make your own wig? Will you sew or use glue?
Why not share your ideas about this wig-making guide or your plans for making your own wig.


