- Home
- DIY Clip-in Hair Extensions
DIY Clip-in Hair Extensions
How to make your own clip-in hair extensions
Hey there, DIYers, welcome to the DIY clip-in hair extensions guide!
That's right, if you find you have some spare hair weave that you don't intend on using for making your own wig or sewing into your hair, then why not add volume to your hair by making your own clip-in hair extensions...
"What about wefts from an unloved lace front?" you ask. Good question; you can use carefully cut those wefts from a formerly much-loved-but-now-not-so-much-loved lace front and turn those into DIY clip-in hair extensions, which is a a great way to repurpose it and save some moolah (that's slang for money... it's a casual mood day hehe).
Tools For DIY Clip-in Hair Extensions

- Clips
- Wefted hair also called hair weave (you can use wefts from a lace front wig you no longer wear)
- Measuring tape
- Scissors or shears if you're feeling professionally fancy
- Good needle and good quality thread
How to Make Your Own Clip-In Hair Extensions
Step 1: Measure the weft
If you want to make the clip-in hair extensions fit specific areas of your head then use the tape measure to to measure those areas where you'll place the clip-in hair extensions.
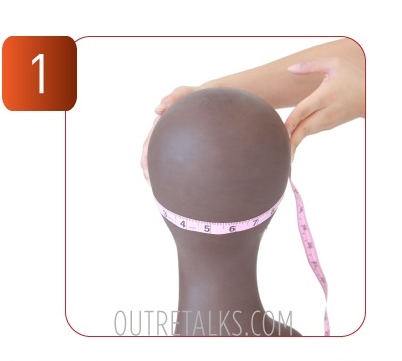
Note the measurements and cut the hair weave according to those measurements
A basic guide for clip-in hair extensions widths are:
One piece of 13 cm (5 inches) for the nape area
One piece of 23 cm (9 inches) for round the back of the head (ear-to-ear)
Two pieces of 10 cm (4 inches) for above the ear on each side
Two pieces of 3 cm (1.5 inches) to fill-in
This is just an idea; create as many pieces in the widths that suit your look.

Step 2 (Optional): Glue two wefts together for a fuller look
Maybe you want to go for an even fuller look and if you do, then you can glue or sew two tracks together.
Work slowly so in order to get the best results.
Apply a very small amount of the glue directly along the woven part at the of one weft - try not to get it on the hair strands.
Wait a few minutes for the glue to set.
Attach the glued weft to the matching unglued weft and press both pieces together and leave to fully dry.

Step 3: Select the clips
Mark out where on the track you will want to attach the clips.
You can use different sized clips for different clip-in hair extension pieces - a single larger clip would be better for a 3 cm wide piece and several smaller clips for the larger hair wefts.
A basic guide for clips are:
Three large clips for the 13 cm (5 inches) for the nape area
Four large clips for the 23 cm (9 inches) for round the back of the head (ear-to-ear)
Three medium clips for each of the 10 cm (4 inches) for above the ear on each side
One large clip for each of the 3 cm (1.5 inches) to fill-in
This is just a suggestion, as always, adapt it to your needs.

Step 4: Sew the clips onto the hair wefts.
When you sew the clips onto the hair wefts, make sure that the teeth of the clip are facing you otherwise you won't be able to clip the hair extensions into your hair (see pink lines in image)
The top of the clip should be against the woven part of the hair weft.
Insert the needle through the top left hole of the clip and sew 5-10 times so that it's secure.
Sew along the top of the clip so that you secure it to the weft along the whole length of the clip and then sew through the top right hole at least 5-10 times until it’s secure.
Knot the thread and cut off any excess thread.
Repeat with each clip.

...And that's how to make your own clip-in hair extensions...look at you, with your new ultra volumised tresses.
These DIY clip-in hair extensions can done on any texture of hair weave, so if you want to give your Afro more oomph or your wavy hair more bounce then go right ahead.
If you have any ideas for other tutorials or want to share tips, use the contact form and your idea could end up being featured in a DIY guide!
If you're not quite ready to be a contributor, but still want to know about the next hair extension guide, wig article or weave-hair how-to, then join our blog, it's really easy and doesn't need any personal info - hooray!
Images and basic steps about how to make a wig can be found at http://www.outretalks.com/


