- Home
- Make Your Own Wig
- DIY Layered Bob
DIY Layered Bob Wig Guide
Make your own layered bob wig with hair weave

Hey there, DIYers, welcome to the DIY layered bob wig guide!
This guide shows you the cool technique of adding layers to your bob wig - without cutting the hair - and this means you'll able to add layers to any style of wig you make; told you it was cool.
If you're new to making wigs from hair weave and want to get the basics then why not check out the make your own wig guide for the basics and don't worry if you don't have lace closure as this tutorial shows you how to make your own closure by rolling up a small piece of hair weave... yay!
Key Ideas for DIY Layered Bob Wig
This DIY guide shows you two additional cool techniques to add a unique look to your bob wig:
2. An off-centre crown so you get a unique fuller look on one side
3. An asymmetrical look (hair is longer on one side)
Before you think that you can't do it, just remember you can pin the tracks on the mannequin before taking the plunge with glue or needle and thread, so you'll get a feel for the overall look before .
That said, if you're not ready to try these two techniques then follow the regular pattern for DIY wig making. Click images to enlarge
Tools For DIY Layered Bob Wig

- Stocking cap or wig cap of your choice
- Straighteners or curling tongs or wand
- Bonding glue if you don't want to sew otherwise curved needle and thread
- Two bundles of hair weave; one 10 cm (4 inches) longer than the other
In this guide the measurements are: 30 cm (12 inch) bundle and 20 cm (8 inch) bundle. You can tailor your look by using more hair weave or even using different colour wefts to create a two-tone look. - Scissors (shears) to cut the hair weave
- Mannequin head
- Pearl head pins - in case you want to pin the tracks first to get an overall look before you glue or sew
How to Make Your Own Layered Bob

Step 1: Measure the weft
Starting from the nape area, add three or four rows straight across at the back using the 20 cm (8 inch) bundle.
Continue adding rows working around the back of the head until you reach the temple area.
Step 2 (optional)
You can either keep the layered bob even on both sides (follow the regular DIY wig making pattern) or if you're feeling brave you can create an asymmetrical look.
Create an asymmetrical style by adding rows of the longer hair weave to the right side of the wig up to the crown area - see left image in photo.
(The right side of the wig when the mannequin is facing away from you).
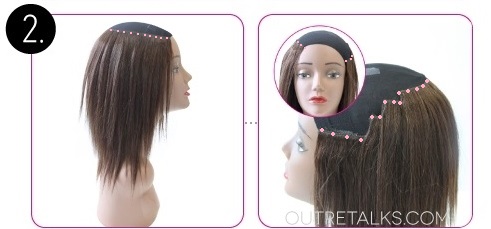
*Make sure these rows don't go all the way round to the left temple, they should stop in a staggered way behind the left ear - see right image in photo.
The left side of the wig should still show the track at the temple area that you completed in Step 1 - see right image in photo.
When the mannequin is facing you, it should be obvious that the tracks are higher on the right side compared to the left - see inset image on the left photo.

Step 3
Using the 30 cm (12 inch) hair weave, start adding rows of hair weave on the left side of the bob wig, as shown by the pink lines in the photo.

Step 4
Start at the front of the wig and add two or three rows of hair weave to create fringe bangs (there's an in-depth DIY fringe bang guide that shows the process).
Optional
Make a right side parting with the fringe bangs to create side swept fringe bangs that will fall on the left side of the bob wig - see image on right.

Step 5 Optional
You can create a fuller look on the left side of the bob wig by marking the crown position on the right side on the top of the wig.
Continue to add tracks in a circular pattern towards the crown - see image with pink lines.
Then, layer the tracks in a circular pattern towards the crown and if you want an even fuller look, then make the rows closer together.
You can even add a different colour of hair weave for this section.

Step 6
For the crown piece, take 2.5 cm (1 inch) of the hair weave and apply a small amount of glue on both sides of the weft making sure the glue is on the woven part at the top only.
Wait few seconds and then roll up the piece so that it’s small enough to fit inside the pea-sized area at the crown.
Apply glue on the base of the crown piece, and stick it inside the pea-sized area. Spread the hair in all directions, and press the centre firmly.

...And that's pretty much all there is to the DIY layered bob wig guide... you'll be turning heads with your new look in no time.
If you have any ideas for other tutorials or want to share tips, why not use the form below and have your comments on this page or even have your idea as a future DIY guide.
If you're not quite ready to be a contributor, but still want to know about the next hair extension guide, wig article or weave-hair how-to, then join our blog, it's really easy and doesn't need any personal info - hooray!
Images and basic steps about how to make a wig can be found at http://www.outretalks.com/
How will you make your own wig?
Do you think you'll take the plunge and make your own wig? Will you sew or use glue?
Why not share your ideas about this wig-making guide or your plans for making your own wig.


