- Home
- Make Your Own Wig
- DIY Two-Tone Wig
How To Make A Wig
(A two-tone effect loose Afro curl wig - no sewing required)
"Can you show how to make a wig with two colours to make a two tone effect with different colour hair weaves?"
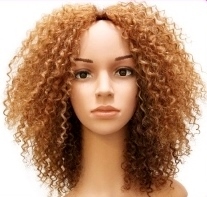 Completed Look
This is the second How To Make A Wig Guide and as we said before, although we don't claim to be professional wig makers (or even professional amateur wig makers for that matter) we do like a bit of the ol' DIY wig making so we've put together another no-sew wig that anyone can make at home; and if it's not quite to your taste, then hopefully you can use the method below as pointers in your pursuit of making your own wigs.
How To Make A Wig: Tools for making your own wig
- Hair wefts (a minimum of three bundles (packs).
You can either choose one length for a non-defined layered look or for a deliberate layered look choose three different lengths.
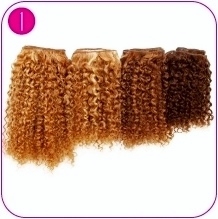
This guide uses four packets of hair weaves measuring 10", 12", 12" and 14"
You can use loose Afro curl textured hair weave or Afro curly, deep wave, loose wave, or water wave textured hair weave - Lace Closure (optional) - we'll show you how to make your own closure piece from hair weave
- Stocking Cap (or elasticated wig cap) - there's no need to measure your head, just find your own size in a stocking cap and you're good to go.
- Bonding Glue
- Bonding Glue Remover (we all make mistakes, so just in case)
- Scissors
- Polystyrene (Styrofoam) or mannequin head
- Disposable shower cap - place this on the mannequin head just in case the glue seeps through the cap (you don't want your fancy new wig to be permanently stuck to the mannequin!).
- Pearl headed pins (optional but really helpful)
How To Make A Wig: Top Tips
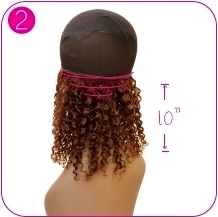
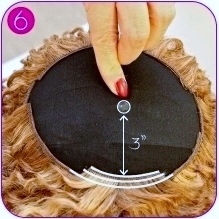
If this is the first time you're researching into how to make a wig, then have a quick look through all of the images first to get a sense of the overall pattern of laying tracks (gluing rows of hair wefts). The pink markings in image 2 and the white markings in image 6 how the wefts should be attached. If you're unsure about how it will look, then use the pearl headed pins to pin the wefts in place first before you glue them.
How To Make A Wig: Step By Step, No Sewing Required
Step 1
This guide uses
four packets of hair weaves in the following lengths and colours:
10" colour 4
12" colour
4/30
12" colour
27/30
14" colour
27/30
Step 2: Attaching the Shortest Length (10 inch)
Place the stocking cap on the mannequin head and secure with pearl head pins if necessary.
The first track will be attached 1 inch above the bottom of the cap line at the nape.
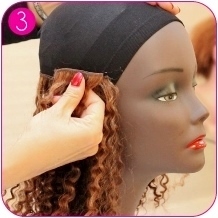
Measure the width of the nape where the first track will be attached. Cut the hair weave to this measurement, apply glue to the weft, allow to become slightly tacky to the touch and then attach to the cap.
Continue by measuring the width of the next track, apply glue and then attach the track close to previous one.
Continue working upwards until all of the 10 inch weft hair extensions have been used.
The pink lines show how the wefts should increase in width as you work upwards.
Step 3: Attaching the 12 inch Darker Shade
You should ultimately end up working from one temple around the back of the head to the other temple.
Space tracks 1 inch apart.
Measure the width of the width of the head (around the back of the head) where the track will be attached. Cut the hair weave to this measurement, apply glue to the weft, allow to become slightly tacky to the touch and then attach to the cap
Continue attaching each track (1" apart) until you reach the temples.
You can add volume to the sides of the wig by attaching 3" wide tracks.
Step 4: Attaching the 12 inch Lighter Shade
Keep working around the head (in a U shape).
Measure, cut, glue and attach the lighter coloured weft hair extensions.
Repeat until the front forehead measures 5" across.
You can add volume by adding one or two tracks to the upper back of the head.
Step 5: Create a Centre Parting
Measure and cut a 5" wide track of lighter coloured 12" hair.
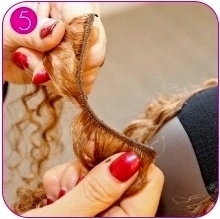
Create a parting by separating the hair in the middle of the track (see image).
Apply glue, and attach the weft at the centre of the front of the wig cap as close as possible to the edge of wig cap.
Attach a total of three or four rows of 5" tracks in this way (separating the hair at the middle to create the parting).
Ensure that each 5" track is laid close to the previous track (so there aren't any gaps at the front of the wig).
Step 6: Circling the Crown
Mark the position of the crown which should be 3" from the front of the cap (you can use a pearl head pin). Measure 1" of the 14" weft hair and set aside for step 9.
Work in circles towards the crown marking.
Measure, cut, glue and attach the remainder of the 12" lighter weft hair extensions and then use the 14" weft hair extensions; continue working in circles until all of the remaining weft hair extensions have been used and fill any spare spaces.
Step 7: Finishing the Crown
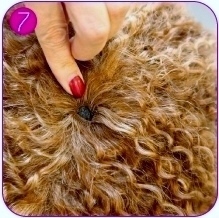
Leave a small pea-sized space at the crown marking for the DIY crown piece.
Step 8: Rolling Up Crown Piece
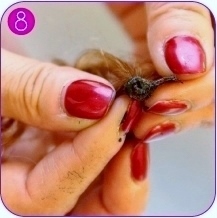
Create the crown piece by taking the 1” width of weft hair and carefully applying a small amount of glue on both sides of the weft - the glue should be on the track only.
Wait 10 seconds then roll up the piece so that it’s small enough to fit inside the pea-sized area at the crown.
Step 9: The Undetectable Crown Finish
Carefully apply a small amount of glue to the base of rolled up crown piece and place it inside the pea-sized area.
Spread the hair in all directions and firmly press the centre of the crown piece.
Fin! You've just created your own two-tone curly wig!
There's a guide to making your own single colour wig and if you'd like to keep up to date with our next guide about how to make wig or anything else to do with lace wigs, hair extensions or hairpieces, then why not join our blog, it's easy to do and doesn't require an email address.
Images and basic steps about how to make a wig can be found at http://www.outretalks.com/
26/03/16
How will you make your own wig?
Do you think you'll take the plunge and make your own wig? Will you sew or use glue?
Why not share your ideas about this wig-making guide or your plans for making your own wig.
Jump from How to Make a Wig to Make A Wig Page
Jump From How to Make a Wig to Home Page

