- Home
- Glue In Extensions 101
How To Glue In Hair Extensions
It’s a simple process to glue in hair extensions and if you want further information have a look at our bonding page as the process is almost identical. If you would like to make a wig using hair weaves and glue then check the link at the bottom of this guide.
We should stress that this is about gluing in wefts without heat so there’s no mention of glue guns or heating tools here and if you're unsure about how to remove glue in hair weaves then peruse the guide to removal of glued in hair extensions, before you get gluing and attaching.
Glue in extensions require care and there's a guide solely dedicated to outlining how to take care of glue in extensions as well as a guide solely devoted to outlining how to wash and condition glue in extensions.
It’s important to emphasise this method of glued in extensions works best on growth hair that's straight to wavy or very, very loose curls. It’s not suited to non-straightened curly or Afro textured hair; but if your curly or Afro textured hair has been straightened this method can be used.
You can use any kind of weft for glue in extensions, not just skin wefts… so for you sticklers who wanted a step by step guide here goes…
You will need
- Bonding Glue like Liquid Gold or Salon Pro
- Hair clips to hold hair back as you bond
- Scissors
- Hair Wefts (known as skin or weaving wefts!)
- Bond Remover like Liquid Gold or another that dissolves bonds for when you take out the weave.
Always start from the bottom up – so if you’re after a full head of weave, then start an inch from the nape of your neck.
In fact it’s a good idea to leave an inch thick perimeter around the circumference of your head.
Glue In Hair Extensions Step By Step Guide

Parting The Hair
1. Make a horizontal parting near the nape of your neck and clip or tie the rest of your hair away allowing the rest of your growth hair to fall against your neck.
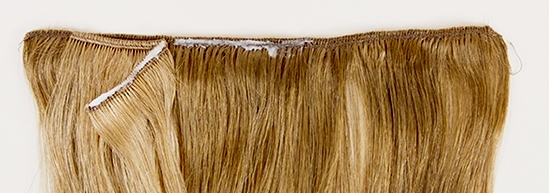
2. Measure the width of the nape and cut one piece of the weft to fit that section (click image to enlarge - enlarge it twice by clicking the expansion box top right of the enlarged image).
Thicker Hair?
3. Sewing two wefts together will give you one thicker (twice as thick) weft but it will also add weight; it may be better to glue wefts closer together instead of doubling up hair wefts.
Gluing The Weft (Hair Weave)
4. Follow the directions for the brand of glue you are using.
Apply the glue all along the top of the weft – where the stitching is located.
Wait for a few seconds for the glue to become tacky to the touch.
Attaching the Weft (Hair Weave)
5. Place the weft against the sectioned hair and press firmly. You can use a cool setting from a hair dryer to make the glue dry more quickly.
6. Repeat steps 1 to 5 to attach your glue in hair extensions.
This method of attaching glue in hair extensions mainly allows you to wear your hair down and back in a pony tail.
Partings
If you’d like to have a parting in the middle of your head or off centre then attach your wefts in a U shape so they go from one ear around the back of your head to the other ear (the step by step guide to making a wig - shows this better).
By doing this you will be able to part the hair on the crown of your head without your glue in hair extensions showing!
Glue-in hair weaves are cared for slightly differently to sewn-in hair weaves and the sew-in and glue-in comparison care guide outlines the similarities and differences of hair weave products, washing weave hair, using nourishing hair oils and conditioning for glue-in and sewn hair extensions.
How to Make A Wig With Hair Weave And Glue
If you'd like to make an actual wig using glue and hair weave (a no-sew wig) why not check out the step by step guide to making a wig - it's an easy to follow guide with pictures to showing exactly where to attach the wefts and you can seal the closure with the weft hair instead of using a lace closure piece.
If you're interest is piqued about hair extensions then check the Hair Extensions Q&A section and if you'd like to keep up to date with articles and guides, then why not join our blog, it's easy to do and doesn't require any personal info - yay!
Jump From Glue In Hair Extensions to Home Page


